

Summary
When managing a Linux server, make a habit of checking your current location and target, running one command at a time, and verifying the result. Start with commands for working with files and directories, such as pwd, ls, cd, mkdir, touch, cat, cp, mv, and rm.
Commands generally follow the format command options target. Deletion, movement, recursive options, and sudo can directly affect the system. Before running them, double-check your current location, the target path, and the intended scope. Linux servers are generally managed by typing commands into a terminal rather than using a mouse.
Typing commands on a dark screen may seem difficult at first. However, the commands used repeatedly in everyday server administration are relatively few.
Start by learning the commands needed for these tasks.
- Checking your current location
- Listing directories and files
- Changing directories
- Creating directories and files
- Copying files
- Moving files and directories
- Deleting files and directories
- Viewing file contents
- Getting command help
- Shutting down and restarting the server
This article explains basic Linux commands using an Ubuntu server.
The Terminal and Command Structure
Understanding the Linux Terminal Prompt
After logging in to a Linux server, you will see a prompt similar to this.
apple2ne1@project-dev-server:~$Each part has the following meaning.
apple2ne1 @ project-dev-server : ~ $
Username Server name Current locationapple2ne1: the currently logged-in user
project-dev-server: the name of the server you are connected to
~: the current user’s home directory
$: a session running with ordinary user privileges
When logged in as the administrator account, root, you may see # instead of $.
root@project-dev-server:~#In general, it is safer to log in as an ordinary user and prefix only the commands that need elevated privileges with sudo, rather than working directly as root.

Basic Command Format
Linux commands generally use the following format.
command options targetConsider the following command.
ls -la /homeEach part has the following meaning.
ls      -la      /home
Command Options Target pathls: lists files and directories
-la: shows detailed information and hidden files
/home: the directory to examine
Not every command requires options and a target.
pwdSome commands, such as pwd, can be used on their own.
Checking Your Current Location and Paths
pwd: Check Your Current Location
Use pwd to find out which directory you are currently working in.
pwdpwd stands for print working directory.
Output:
/home/apple2ne1This means your current working directory is /home/apple2ne1.
Make a habit of using pwd to check your current location before copying or deleting files on a server.
Absolute and Relative Paths
Linux provides two ways to specify the location of a file or directory: absolute paths and relative paths.
Absolute Paths
An absolute path is the full path starting from the top-level directory, /.
/home/apple2ne1/projectsAn absolute path always refers to the same location, regardless of your current directory.
Example:
cd /home/apple2ne1/projectsRelative Paths
A relative path describes a location starting from your current directory.
If your current directory is /home/apple2ne1, the following command moves into its projects subdirectory.
cd projectsThe destination of a relative path can change depending on your current directory.
Common Path Symbols
Linux paths use several special symbols.
| Symbol | Meaning |
|---|---|
/ |
The starting point of the entire Linux directory hierarchy |
~ |
The current user’s home directory |
. |
The current directory |
.. |
The immediate parent directory |
- |
The previous working directory, when used with cd |
For example, the following command moves to the current user’s home directory.
cd ~The following command produces the same result.
cdTo move to the parent directory, enter:
cd ..To return to the directory you were in previously, use:
cd -Listing Files and Directories
ls: View a Directory Listing
Use ls to see the files and subdirectories in your current directory.
lsExample output:
Documents Downloads projects notes.txtIn a terminal with color enabled, directories and files may appear in different colors.
ls -l: View Details
Use the -l option to display file permissions, ownership, size, and modification time.
ls -lExample output:
drwxr-xr-x 2 apple2ne1 apple2ne1 4096 Jul 20 10:20 project
-rw-r--r-- 1 apple2ne1 apple2ne1  520 Jul 20 10:30 notes.txt
The main fields are as follows.
Permissions Owner      Group       Size   Modified       Name
drwxr-xr-x   apple2ne1   apple2ne1    4096   Jul 20 10:20   projects
If the first character is d, the entry is a directory.
drwxr-xr-xIf the first character is -, the entry is a regular file.
-rw-r--r--ls -a: Show Hidden Files
Linux treats files and directories whose names start with a dot as hidden entries.
Example:
.ssh
.bashrc
.git
To include hidden entries, use:
ls -als -la: Show Details and Hidden Files Together
This is one of the most frequently used forms in everyday work.
ls -laIt combines the -l and -a options.
The following two commands mean the same thing.
ls -lals -l -a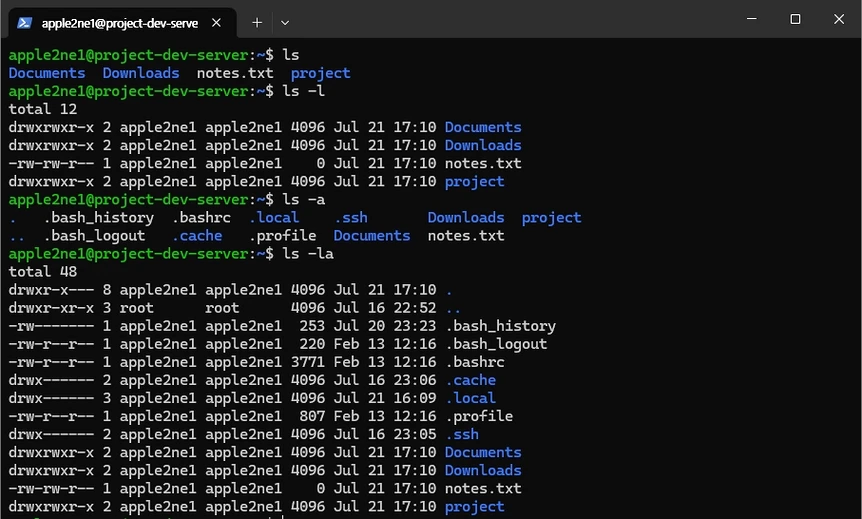
List a Specific Directory
You can examine another directory without changing your current location.
ls /homeTo view the contents of the home directory in detail, enter:
ls -la /home/apple2ne1Changing Directories
cd: Change Directory
Use cd to move to another directory.
cd stands for change directory.
cd projectThis moves into the project subdirectory of your current directory.
After moving, check your current location.
pwdMove to Your Home Directory
The following command moves to the current user’s home directory.
cdAlternatively, you can enter:
cd ~A user’s home directory is usually located at a path like this.
/home/usernameExample:
/home/apple2ne1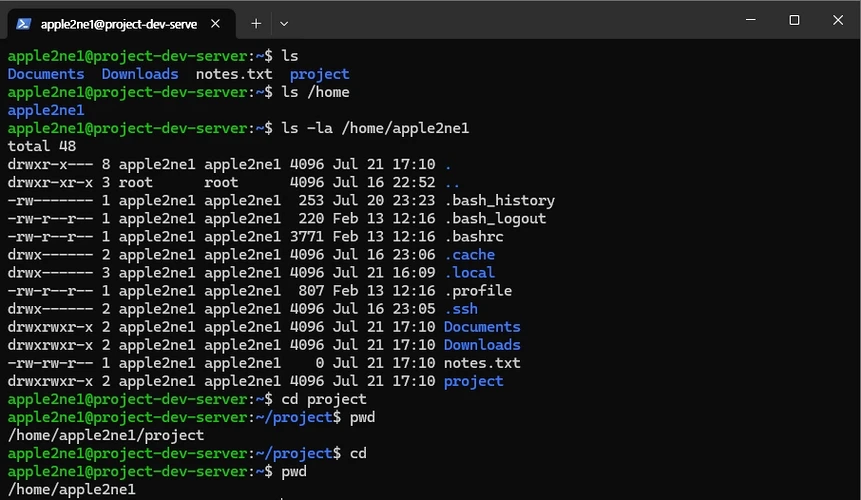
Move to the Parent Directory
To move one level above your current directory, use:
cd ..For example, if your current location is:
/home/apple2ne1/projectAfter running cd .., your location will be:
/home/apple2ne1To move up two levels, enter:
cd ../..Move to the Root Directory
To move to the starting point of the entire Linux directory hierarchy, use:
cd // is called the root directory.
You can see the following main directories.
lsExample output:
bin boot dev etc home opt root tmp usr var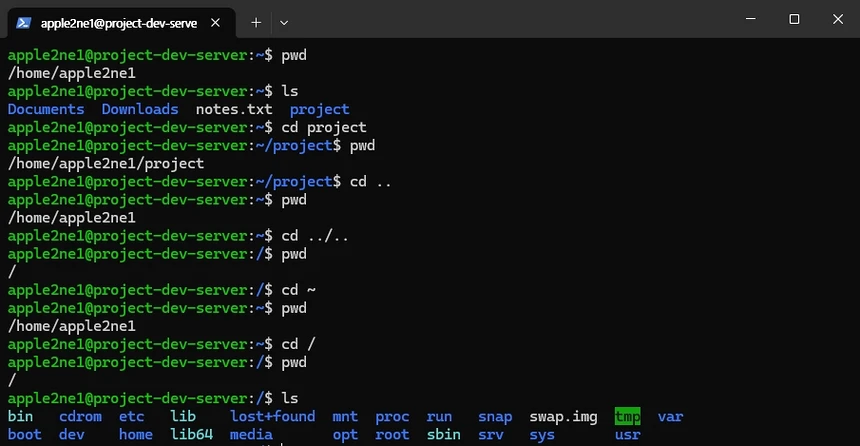
Return to the Previous Directory
To return to your previous working directory, use:
cd -Example:
cd /etc
cd /var
cd -
The final command returns you to /etc.
Creating Directories
mkdir: Create a Directory
Use mkdir to create a new directory.
mkdir stands for make directory.
mkdir projectThis creates a directory named project in your current location.
Check:
ls -lCreate Multiple Directories at Once
You can create several directories in one command.
mkdir images documents backupThis creates the following three directories.
images
documents
backup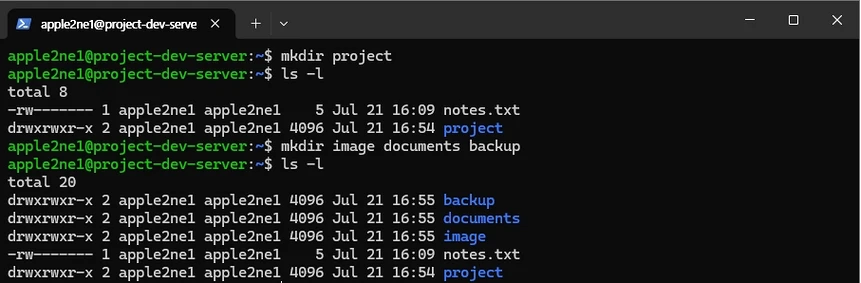
mkdir -p: Create a Nested Directory Structure
Suppose you want to create a directory structure with several levels at once.
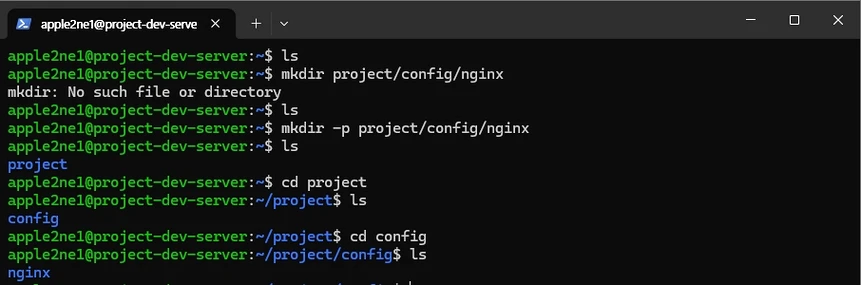
project/config/nginxA plain mkdir command may fail if the intermediate directories do not exist.
mkdir project/config/nginxExample error:
mkdir: cannot create directory ‘project/config/nginx’: No such file or directoryUse the -p option in this case.
mkdir -p project/config/nginxAll the required intermediate directories are created as well.
project
└── config
    └── nginx
Think of -p as creating the parent directories too.
If the directory already exists, the command normally continues without an error.
Creating Files
touch: Create an Empty File
Use touch to create an empty file.
touch notes.txtCheck:
ls -lExample output:
-rw-r--r-- 1 apple2ne1 apple2ne1 0 Jul 20 11:10 notes.txtA size of 0 means the file does not yet contain any data.
Create Multiple Files at Once
You can create several empty files at once as follows.
touch file1.txt file2.txt file3.txtAnother Use of touch
Running touch on an existing file updates its modification time to the current time without changing its contents.
touch notes.txtThus, touch is also a command for updating file timestamps, rather than simply creating files.
Viewing File Contents
cat: Display an Entire File
Use cat to display the contents of a text file all at once.
cat notes.txtExample contents:
Linux server setup notes
SSH port: 22
This is convenient for short files.
For a very long file, the text scrolls past quickly, so another command is more suitable.
less: Read a Long File
Use less to read a long file one screen at a time.
less notes.txtMain controls:
| Key | Action |
|---|---|
Space |
Next screen |
b |
Previous screen |
| Arrow keys | Move one line at a time |
/word |
Search for a word |
n |
Next search result |
q |
Quit |
This is often used to read server logs and long configuration files.
Example:
less /var/log/auth.logIf elevated permissions are required, you can run it as follows.
sudo less /var/log/auth.loghead: View the Beginning of a File
Use the following command to view the first 10 lines of a file.
head notes.txtUse the -n option to view the first 20 lines.
head -n 20 notes.txttail: View the End of a File
Use the following command to view the last 10 lines of a file.
tail notes.txtLast 20 lines:
tail -n 20 notes.txttail -f: Follow a Log in Real Time
Use the following command to watch new content as it is added to a log file.
tail -f /var/log/auth.logThis is useful for continuously updated logs, such as SSH connection records.
To stop, press:
Ctrl + CEditing Files
nano: A Simple Text Editor
nano is a beginner-friendly editor for modifying files in the terminal.
nano notes.txtIf the file does not exist, you can create it; if it already exists, you edit its current contents.
Shortcuts like the following appear at the bottom of the screen.
^O Write Out
^X Exit
Here, ^ represents the Ctrl key.
Save
Ctrl + OCheck the filename, then press Enter.
Exit
Ctrl + XSave and Exit
Ctrl + O
Enter
Ctrl + X
If you press Ctrl + X after making changes, you may be asked whether to save them.
Save modified buffer?Y: save
N: exit without saving
Ctrl + C: cancel exiting
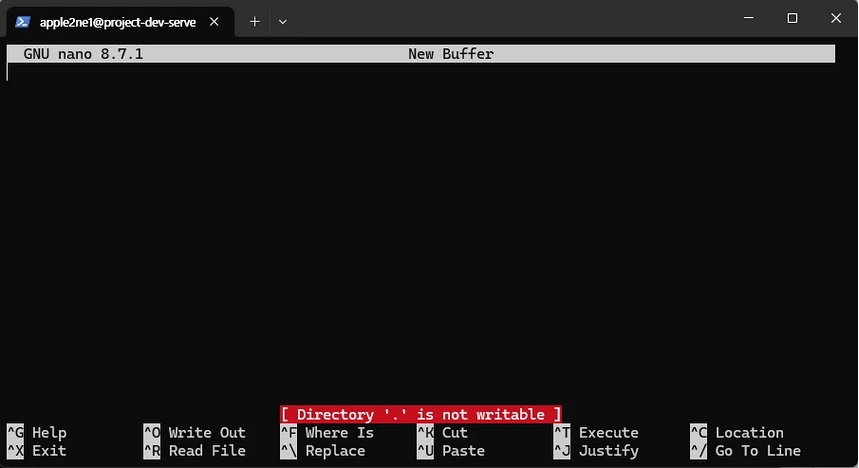
The screenshot below shows an empty Nano buffer and its shortcuts, with a warning that the current directory is not writable. It does not demonstrate a successful file save. If you see the same warning, exit Nano, move to your own writable home directory, and run nano notes.txt again.
Copying Files and Directories
cp: Copy a File
Use cp to copy a file.
cp stands for copy.
cp notes.txt notes-backup.txtThis copies notes.txt to a new file named notes-backup.txt.
Check:
ls -lCopy a File to Another Directory
You can copy a file from your current location to another directory.
cp notes.txt backup/You can also change the filename while copying it.
cp notes.txt backup/server-notes.txtcp -r: Copy a Directory
Use the -r option to copy a directory along with its contents.
cp -r project project-backup-r stands for recursive.
This means copying subdirectories and their files as well.
cp -i: Confirm Before Overwriting
Use the -i option to request confirmation before overwriting an existing file with the same name.
cp -i notes.txt backup/notes.txtYou may see a question like this.
cp: overwrite 'backup/notes.txt'?Enter y to overwrite or n to cancel.
cp -a: Copy While Preserving Attributes
Use the -a option to preserve attributes such as permissions, ownership, and timestamps as far as possible.
cp -a project project-backupThis is often used for backups.
Moving Files and Directories
mv: Move a File
Use mv to move a file to another directory.
mv stands for move.
mv notes.txt documents/This moves notes.txt from the current location into the documents directory.
mv: Rename a File
On Linux, mv also handles file renaming.
mv notes.txt server-notes.txtThis renames notes.txt to server-notes.txt.
Rename a Directory
You can rename a directory in the same way.
mv old-project new-projectMove Multiple Files into the Current Directory
When moving several files, it is safer to inspect the targets first and name them explicitly, rather than using a glob pattern to select everything in the parent directory.
ls -la ..
mv ../notes.txt ../config.yaml .
The final . means the current directory. This example moves only notes.txt and config.yaml from the parent directory into the current directory.
A broad glob selecting the parent directory’s contents can unexpectedly move sibling entries of your current directory, while excluding hidden files whose names start with a dot. Do not use it in beginner exercises.
Deleting Files and Directories
rm: Delete a File
Use rm to delete a file.
rm notes.txtFiles deleted from a Linux terminal generally do not go to a recycle bin.
Be careful: running the command deletes the file immediately.
Delete Multiple Files
You can delete several files at once.
rm file1.txt file2.txt file3.txtrm -i: Confirm Before Deleting
Use the -i option to request confirmation before deletion.
rm -i notes.txtExample output:
rm: remove regular file 'notes.txt'?Enter y to delete or n to cancel.
Using rm -i is safer when you are first learning Linux.
rmdir: Delete an Empty Directory
Use rmdir to delete an empty directory.
rmdir empty-folderThe directory will not be removed if it contains files or other directories.
Example error:
rmdir: failed to remove 'project': Directory not emptyrm -r: Delete a Directory and Its Contents
Use the -r option to delete a directory and all the files inside it.
rm -r projectThis command deletes the project directory and everything it contains.
To confirm each deletion, enter:
rm -ri projectrm -rf: Force Deletion
The following command forcibly deletes a directory and all its contents without asking for confirmation.
rm -rf projectOption meanings:
-r = recursively delete entries within directories
-f = ignore nonexistent files and missing operands, and never prompt
rm -rf is a very powerful and dangerous command.
In particular, never run a command like this.
sudo rm -rf /This extremely dangerous command targets the entire system for deletion. Modern GNU rm refuses to delete / directly by default, but bypassing its protection or specifying the wrong path in a recursive deletion can still severely damage the system.
An empty path variable can also be dangerous, as in the following example.
rm -rf "$TARGET"/*If $TARGET is empty or has an unexpected value, you could delete the wrong location.
Always check with the following commands before deleting anything.
pwd
ls -la
It is also a good idea to display the deletion target first.
ls -la projectFinding Files
find: Find Files and Directories
To find a file with a particular name beneath your current directory, enter:
find . -name "notes.txt"Meaning of each part:
find   .   -name   "notes.txt"
Find   Here       By name  Name to find
Search Without Matching Case
Use -iname for a case-insensitive search.
find . -iname "notes.txt"All of the following files may be found.
notes.txt
Notes.txt
NOTES.TXT
Find Only Directories
Use -type d to search only for directories.
find . -type d -name "backup"Find Only Files
Use -type f to search only for regular files.
find . -type f -name "*.txt"*.txt matches filenames ending in .txt.
Searching File Contents
grep: Find Text Within a File
Use grep to find a particular word or phrase in a file’s contents.
grep "SSH" notes.txtThis prints the lines in notes.txt that contain SSH.
Search Without Matching Case
grep -i "ssh" notes.txtThe search can match all of the following forms.
SSH
ssh
Ssh
Show Line Numbers
grep -n "SSH" notes.txtExample output:
12:SSH port is 22.12 means that the text appears on line 12 of the file.
Search Multiple Files and Subdirectories
Use the -r option to search files in the current directory and its subdirectories.
grep -r "project-dev-server" .To search without matching case and display line numbers, enter:
grep -rin "project-dev-server" .Checking File Sizes and Disk Space
du: Check File and Directory Space Usage
Use the following command to show the total space used by the current directory in a readable format.
du -sh .Option meanings:
-s = show only the total
-h = display human-readable units
Example result:
1.2G .This means the current directory uses approximately 1.2 GB.
Check the Size of a Specific Directory
du -sh projectUse the following command to check the size of each entry in the current directory.
du -sh *Hidden entries may be excluded.
df: Check Overall Disk Usage
Use the following command to check total disk capacity and available space.
df -hExample result:
Filesystem      Size  Used Avail Use% Mounted on
/dev/sda2       916G   42G  828G   5% /
Main fields:
Size: total size
Used: space in use
Avail: available space
Use%: percentage used
Mounted on: mount location
This is a useful first command when the server is running low on storage.
Checking System and User Information
whoami: Identify the Current User
This displays the username of the currently logged-in user.
whoamiExample result:
apple2ne1id: Check User and Group Information
Use the following command to check the current user’s ID and group memberships.
idExample output:
uid=1000(apple2ne1) gid=1000(apple2ne1) groups=1000(apple2ne1),27(sudo)If the current user belongs to the sudo group, they can use sudo to run commands that require administrator privileges.
groups: Check Group Memberships
Use the following command for a simple list of the groups the current user belongs to.
groupsExample result:
apple2ne1 sudohostname: Check the Server Name
This displays the current server’s name.
hostnameExample result:
project-dev-serverUse the following command for more detailed system information.
hostnamectluname: Check Linux Kernel Information
Check the kernel name:
unameShow all available information:
uname -aCheck the Ubuntu Version
Use the following command to check the Ubuntu version.
lsb_release -aAlternatively, inspect the following file.
cat /etc/os-releaseExample result:
NAME="Ubuntu"
VERSION="26.04 LTS"
Check the Date and Time
This displays the server’s current date and time.
dateExample result:
Mon Jul 20 13:30:15 PDT 2026Use the following command to check the time zone settings as well.
timedatectlBasic Network Commands
ip addr: Check IP Addresses
Use the following command to check the server’s network addresses.
ip addrYou can also use this shorter form.
ip aLook for a section like this in the output.
inet 192.168.1.231/24Here, the server’s IP address is:
192.168.1.231127.0.0.1 is a loopback address used only within the server. It is not the address an external PC uses to connect to it.
Display Just the IP Addresses
The following command provides a simple list of the IP addresses assigned to the server.
hostname -IExample result:
192.168.1.231If there are multiple network interfaces, several IP addresses may appear.
ping: Check Network Connectivity
Use ping to check whether you can communicate with another device.
ping 192.168.1.240Check Internet connectivity:
ping google.comOn Linux, ping can continue running indefinitely.
To stop, press:
Ctrl + CTo limit it to four requests, enter:
ping -c 4 google.comss: Check Ports in Use
Use the following command to inspect ports that are open or listening on the server.
ss -tulnOption meanings:
t: TCP
u: UDP
l: listening sockets
n: show port numbers numerically
To check the default SSH port, 22, you can use:
ss -tuln | grep ":22"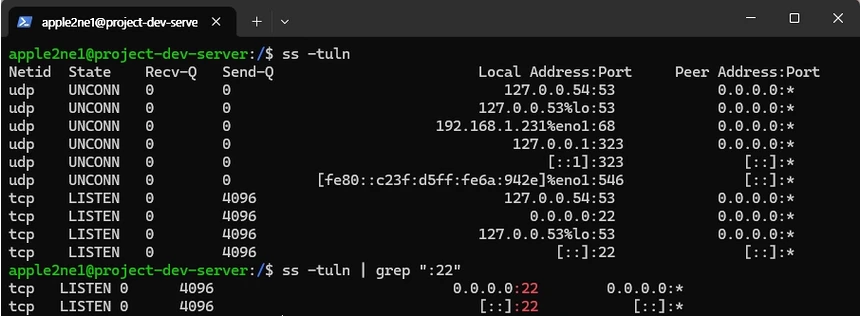
Using Administrator Privileges
sudo: Run a Command with Administrator Privileges
An ordinary user may need administrator privileges to change system settings.
Prefix the command with sudo in that case.
sudo apt updatesudo runs a command as another user. Unless a user is specified, it normally runs the command as root.
The first time you run it, you may be asked for your current user’s password.
[sudo] password for apple2ne1:No characters or asterisks appear on screen while you type the password.
The input is being accepted; it is simply hidden for security.
Enter the password, then press Enter.
Why You Should Not Use sudo for Every Command
sudo grants powerful privileges that can affect the entire system.
An incorrect command can cause problems such as:
- Deleting system files
- Changing permissions and ownership
- Stopping services
- Boot failures
- Loss of network connectivity
You usually do not need sudo to create or edit ordinary files in your own home directory.
For example, the following commands are best run as an ordinary user.
mkdir ~/project
touch ~/notes.txt
nano ~/notes.txt
Creating personal files with sudo can make root their owner, preventing your ordinary user account from editing them later.
Installing and Updating Software
apt update: Refresh Package Lists
Use the following command to refresh the information Ubuntu uses to install software.
sudo apt updateThis updates the lists of available packages, rather than updating the installed programs themselves.
apt upgrade: Update Installed Software
Use the following command to update installed packages to their latest available versions.
sudo apt upgradeIf a confirmation prompt appears, review the proposed changes before proceeding.
You can use the -y option to answer yes automatically.
sudo apt upgrade -yOn a server, however, it is safer to review the changes before proceeding.
Install Software
For example, enter the following command to install tree.
sudo apt install treeYou may be asked to confirm the installation.
Do you want to continue? [Y/n]Press Y or Enter to continue.
Remove Software
Use the following command to remove an installed program.
sudo apt remove treeUse the following command to remove its configuration files as well.
sudo apt purge treeUse the following command to remove dependencies that are no longer needed.
sudo apt autoremoveManaging Services
systemctl status: Check Service Status
Use the following command to check the SSH service status.
sudo systemctl status sshKey status:
active (running)This means the service is running normally.
To leave the status display, press:
qStart a Service
sudo systemctl start sshStop a Service
sudo systemctl stop sshBe careful when stopping the SSH service during a remote SSH session: it can affect current or subsequent connections.
Restart a Service
After changing the configuration file, check its syntax first.
sudo sshd -tIf there are no errors, apply the configuration with the following command.
sudo systemctl restart sshRestarting during a remote SSH session can disconnect you, so have a separate server console or another recovery method available.
Configure Automatic Startup at Boot
The following commands apply to a configuration that runs ssh.service directly. For socket-activated configurations used since Ubuntu 22.10, also read the ssh.socket explanation that follows.
sudo systemctl enable sshDisable automatic startup:
sudo systemctl disable sshCheck whether automatic startup is enabled:
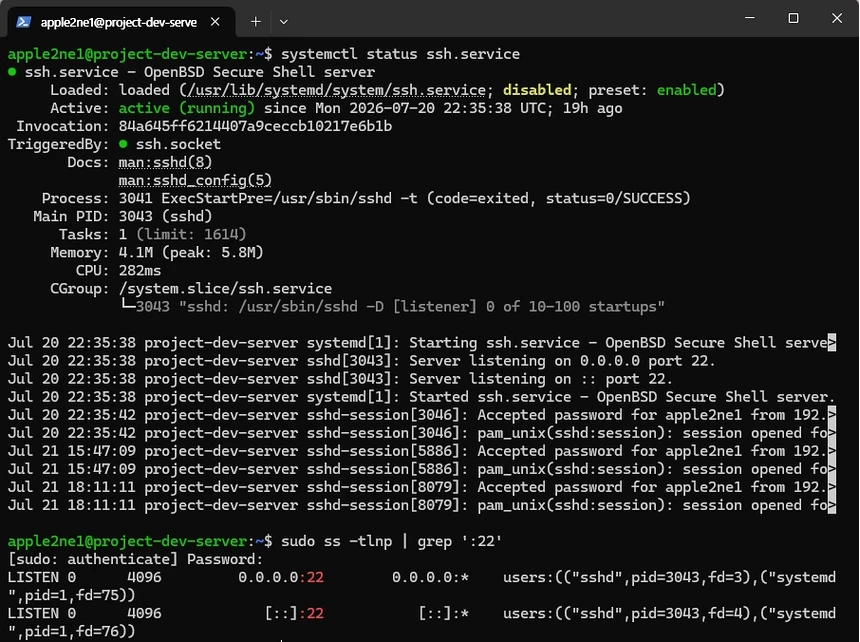
sudo systemctl is-enabled sshdisabled After Selecting OpenSSH Server During Ubuntu Installation
Since Ubuntu 22.10, and particularly on Ubuntu 24.04 LTS, ssh.service may show disabled even though you selected OpenSSH Server during installation, because SSH may be activated through ssh.socket rather than directly through ssh.service. The configuration can vary with the distribution version and changes made after installation.
Do not conclude that SSH will be unavailable after boot solely because ssh.service is disabled. Check ssh.socket and whether the actual port is listening as well.
Check with the following commands.
systemctl is-enabled ssh.socket
systemctl is-active ssh.socket
Example of a normal result:
enabled
active
In this state, ssh.socket begins listening when the computer boots and starts ssh.service when an incoming SSH connection request arrives. This is called socket activation.
To check the status in detail:
systemctl status ssh.socket
systemctl status ssh.service
Alternatively, check whether the SSH port is actually listening.
sudo ss -tlnp | grep ':22'Example result:
LISTEN 0 4096 0.0.0.0:22This result indicates that the server is ready to receive SSH connection requests.
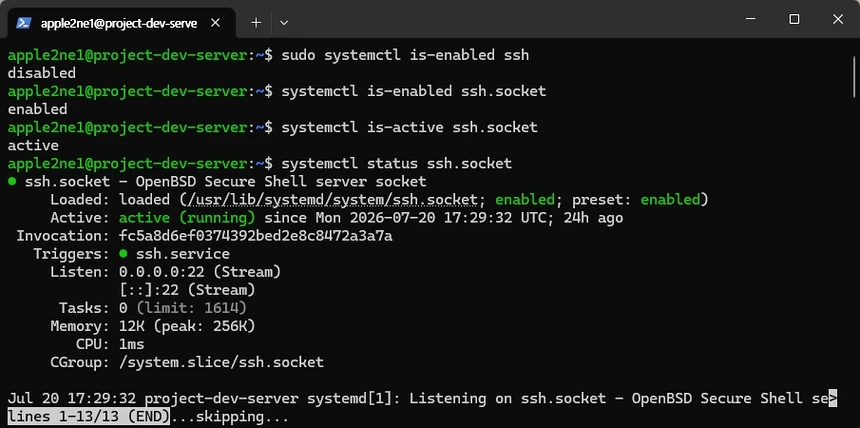
The startup setting and current running state are different. In the next screenshot, check the Loaded and Active fields separately.
Stopping Commands and Clearing the Screen
Ctrl + C: Stop a Running Command
Use this to stop a command that keeps running.
Example:
ping google.comStop:
Ctrl + CYou can also use it to interrupt tail -f, some installation commands, and running programs.
clear: Clear the Terminal Screen
Use the following command to clear the terminal display.
clearYou can also use a keyboard shortcut.
Ctrl + LThis clears the visible display; it does not delete your command history.
history: View Previous Commands
Use the following command to view the commands you have entered.
historyExample output:
101  pwd
102  ls -la
103  cd project
104  nano notes.txt
You can also find only the commands containing a particular word.
history | grep sshReuse a Previous Command
Press the up arrow key to recall a previous command.
↑Press the down arrow key to move forward through the history.
↓You can edit and run a recalled command without retyping it in full.
Tab: Auto-Completion
Type part of a filename or directory name, then press Tab to complete it automatically.
For example, suppose the following directory exists.
project-developmentType only the beginning of its name, as follows.
cd proPressing Tab may then complete it automatically.
cd project-developmentIf several names match, press Tab twice to see the available options.
Auto-completion is very useful for reducing typos and entering long paths quickly.
Getting Command Help
--help: Brief Help
Most commands provide a --help option.
ls --helpcp --helprm --helpIt shows the supported options and how to use the command.
man: Command Manuals
Use man for more detailed documentation.
man lsman stands for manual.
Main controls:
| Key | Action |
|---|---|
Space |
Next screen |
b |
Previous screen |
/word |
Search |
q |
Quit |
Example:
man chmodwhich: Locate a Command
This checks the path where a particular command is installed.
which sshExample result:
/usr/bin/sshIf the command is not installed, there may be no output.
Combining Commands
The Pipe |
Use a pipe to pass the output of one command to another.
history | grep sshExecution sequence:
historyprints previous commands.
grep sshdisplays only the lines containingssh.
Another example:
ls -la | lessThis lets you view a long file listing one screen at a time.
>: Save Output to a File
Use > to save a command’s output to a file.
ls -la > file-list.txtThe output is saved in file-list.txt instead of being displayed on screen.
If the file already exists, its contents are overwritten.
>>: Append to an Existing File
Use >> to append new output while preserving the existing contents.
date >> server-log.txtEach time the command runs, date information is appended to the file.
&&: Run the Next Command Only If the First Succeeds
mkdir project && cd projectExecution sequence:
- Create the
projectdirectory.
- If creation succeeds, move into
project.
You can use the following to refresh the package lists and then upgrade packages.
sudo apt update && sudo apt upgradeIf the first command fails, the second does not run.
;: Run the Next Command Regardless of Success
pwd; ls -laOnce pwd finishes, ls -la runs regardless of whether pwd succeeded.
When first learning Linux, run commands one at a time and check the results, rather than combining several commands on one line.
Shutting Down and Restarting the Server
Shut Down the Server
Use the following command to shut down a Linux server safely.
sudo shutdown nowAlternatively, use:
sudo poweroffThe SSH connection closes when the server powers off.
To use a physical server again, you may need to press its power button or use a remote power feature such as Wake-on-LAN (WOL).
Shut Down After a Delay
Shut down in 10 minutes:
sudo shutdown +10Cancel the scheduled shutdown:
sudo shutdown -cRestart the Server
Use the following command to restart the server.
sudo rebootYour SSH connection closes when the restart begins.
Wait for the server to start again, then reconnect.
After changing network or SSH settings, check that the configuration is correct before restarting immediately.
Quick Reference for Common Commands
| Command | Purpose |
|---|---|
pwd |
Check the current location |
ls |
List files and directories |
ls -la |
Show a detailed listing including hidden entries |
cd |
Change directory |
mkdir |
Create a directory |
mkdir -p |
Create a directory and any required parents |
touch |
Create an empty file or update its modification time |
cat |
Print an entire file |
less |
Read a long file one screen at a time |
head |
View the beginning of a file |
tail |
View the end of a file |
tail -f |
Follow a log in real time |
nano |
Edit a text file |
cp |
Copy a file |
cp -r |
Copy a directory |
mv |
Move or rename a file |
rm |
Delete a file |
rmdir |
Delete an empty directory |
rm -r |
Delete a directory and its contents |
find |
Find files and directories |
grep |
Search file contents |
du -sh |
Check directory space usage |
df -h |
Check overall disk usage |
whoami |
Identify the current user |
id |
Check user and group information |
hostname |
Check the server name |
ip addr |
Check network interfaces and IP addresses |
ping |
Check network connectivity |
sudo |
Run a command with administrator privileges |
systemctl |
Check and manage services |
history |
View previous commands |
clear |
Clear the terminal screen |
man |
Read a command manual |
shutdown |
Shut down the server |
reboot |
Restart the server |
Essential Precautions for Beginners
Check Your Current Location Before Deleting
pwd
ls -la
Always check your current location and deletion targets, especially before using rm, rm -r, or rm -rf.
Quote Paths That Contain Spaces
Suppose a directory has the following name.
My ProjectEnclose a path containing spaces in quotes.
cd "My Project"Alternatively, put a backslash before the space.
cd My\ ProjectThis is necessary because the shell uses spaces to separate command arguments.
Pay Attention to Letter Case
Linux distinguishes uppercase and lowercase letters in filenames and command names.
The following names refer to different files.
notes.txt
Notes.txt
NOTES.txt
These commands are also different.
ls
LS
ls is a valid command, whereas LS usually does not exist.
Spell Commands Correctly
The following command is correct.
mkdir projectThe following command is incorrect.
mkidr projectExample error:
mkidr: command not foundIf you see command not found, check the command’s spelling first.
Avoid Unnecessary sudo for Personal Files
You usually do not need sudo to create files or directories in your home directory.
mkdir ~/project
touch ~/project/notes.txt
Using sudo unnecessarily can make root the owner of a file, preventing an ordinary user from editing it.
Check the Result After Each Command
Make a habit of running one command at a time and checking its result, rather than executing many commands at once.
Example:
mkdir projectCheck:
ls -ld projectMove:
cd projectCheck the current location:
pwdThis approach reduces mistakes and helps you understand how Linux commands work.
Basic Practice
Follow this exercise in order to learn the main basic commands.
Step 1: Move to Your Home Directory
cdCheck the current location:
pwdStep 2: Create a Practice Directory
mkdir linux-practiceCheck:
ls -lStep 3: Enter the Practice Directory
cd linux-practiceCheck the current location:
pwdStep 4: Create Subdirectories
mkdir documents backupCheck:
ls -lStep 5: Create a File
touch notes.txtStep 6: Edit the File
nano notes.txtEnter the following text.
Linux command practice
Server name: project-dev-server
Save:
Ctrl + O
Enter
Exit:
Ctrl + XStep 7: View the File Contents
cat notes.txtStep 8: Copy the File
cp notes.txt backup/notes-backup.txtCheck:
ls -l backupStep 9: Move the File
mv notes.txt documents/Check:
ls -l documentsStep 10: Rename the File
mv documents/notes.txt documents/linux-notes.txtStep 11: Check the Entire Structure
If tree is installed, you can use:
treeExpected result:
.
├── backup
│   └── notes-backup.txt
└── documents
    └── linux-notes.txt
If tree is not installed, install it with:
sudo apt install treeStep 12: Delete the Practice Directory
First, move to your home directory.
cdCheck the directory you intend to delete.
ls -la linux-practiceDelete it with confirmation prompts.
rm -ri linux-practiceKey Takeaways
You do not need to memorize every command at once when learning Linux basics.
Start by using the following commands repeatedly.
pwd
ls -la
cd
mkdir
touch
nano
cat
cp
mv
rm
Check your current location before working on the server.
pwdCheck the files and directories.
ls -laBefore running a deletion or movement command, double-check the target path.
ls -la target-pathLinux commands are short, but they directly affect the system. Running one command and checking its result makes server administration much safer.
Precautions and Limitations
- Overwrite and deletion behavior in
rm,mv, andcpcan vary with options, aliases, and the distribution environment. Use--helpormanto check your current environment. rm -rfrecursively removes files and directories without confirmation. Do not use it as a routine fix in learning exercises.- Use
sudoonly when needed, and check the target path and the command’s effects before running it. apt upgradeand service restarts can affect running services. Review the proposed changes and maintenance window first.- A missing
pingreply does not necessarily mean the network connection is down. A firewall or the target device may block ICMP replies. - This article introduces basic commands. It does not replace comprehensive coverage of shell expansion, permissions, processes, log analysis, or network diagnostics.
References and Sources
- GNU Coreutils Manual — basic commands for files, directories, file contents, and storage — 2026-08-02
- Ubuntu Manpages — Ubuntu package, network, and system commands, including
apt— 2026-08-02 - Ubuntu 24.04 LTS @@INLINE_0@@ Manpage —
rm -f, recursive deletion, and--preserve-rootbehavior — 2026-08-02 - Ubuntu 24.04 LTS Release Notes — scope of OpenSSH systemd socket activation — 2026-08-02
- systemd @@INLINE_0@@ — checking, starting, stopping, and restarting services — 2026-08-02