
Key summary
Aside is a web browser for visiting websites, searching, and working with multiple tabs, much like Google Chrome or Microsoft Edge. It integrates an AI agent that carries out web tasks at your request, making it an AI browser focused on website tasks. You can browse yourself and hand tasks to the AI when you need help.
For example, you can describe the result you want: “Summarize the page I am viewing” or “Find information across several websites and compare it.” The AI reads pages, navigates websites, and works through the requested task. This lets you delegate some of the work you would normally do on the web to the AI inside your browser. You still need to set up any required account sign-ins and permissions, and you may need to handle a website’s authentication or approval requests yourself. Task guide
Using Aside this way lets you go beyond an AI that answers questions to an AI that works alongside you in your browser. You define the goal and scope, the AI helps find and organize information, and you review the results and decide what to do next.
This article explains the Windows and macOS installation paths separately, then walks through account and workspace setup before checking a small task that reads a public page.
Get the installer from the official download page. The official instructions say the page automatically selects the file for your operating system. On Windows, open the executable; on macOS, open the disk image and move the app to Applications.

The Aside installation and setup workflow
The goal is to launch the app → sign in → import only the data you need → configure models and permissions → check your first result. Check that the application opens and that an AI task finishes correctly as separate steps. Keeping your usual browser while you learn Aside makes it easier to compare how they work before replacing your existing browser.
Before you start
Have an internet connection and an Aside account ready. If you do not have an account, create one from the app’s welcome screen. If you want to import information from another browser, decide which profile to use beforehand. A profile keeps browsing history and sign-in state separate, for example for personal and work use.
| Item | What the official sources confirm |
|---|---|
| macOS | The getting-started guide specifies macOS 15.0 or later |
| Windows | An official download is available, and the changelog announces the Windows release |
| Windows minimum requirements | The installation and getting-started pages reviewed do not specify minimum OS, CPU, or memory requirements |
| Account | Sign in to Aside or create an account during setup |
The Windows release is confirmed in v1.0.914.1 of the browser changelog. However, the getting-started guide still lists only macOS requirements. Do not apply those requirements to Windows or assume support for a particular Windows version or ARM device.
Verification environment
| Item | Scope of verification |
|---|---|
| Sources reviewed on | 2026-10-07 |
| Scope | Aside installation and initial setup on Windows and macOS |
| Method | Compared official downloads, help pages, and changelog entries with user-provided screenshots |
| Hands-on installation testing | Not performed |
| Screenshot review | Checked menus, input, and responses in user-provided Windows screenshots |
| Installer and execution checks | Installer signatures and hashes, hands-on installation on individual devices, and task execution were not verified |
The steps below are based on official documentation and user-provided screenshots. The examples show Windows; the layout may differ on macOS. Installer filenames, button positions, and available models may change between versions, so also check the instructions on your own screen.
Instructions
1. Download the installer from the official page
- Open the Aside download page on the computer where you want to install it.
- Check whether the download starts automatically.
- If it does not, use the
Download Aside manuallylink. - In your Downloads folder, check that the file is for your operating system.
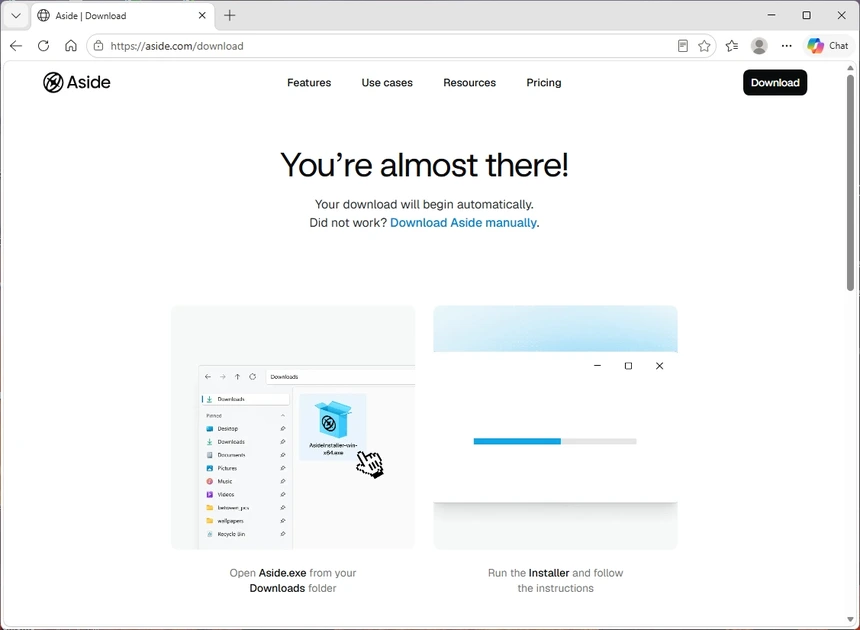
Windows users should continue to step 2 below; macOS users should go to step 3. If you receive an installer for a different operating system, do not run it; check the options on the official page again. The screenshot above shows the Windows download instructions. On macOS, check the download option shown for your operating system.
2. Install on Windows
- Open the Aside executable in your Downloads folder.
- Follow the installer’s instructions.
- Launch Aside when installation finishes.
- Check that the welcome screen opens normally, then proceed to account setup in step 4.
The official instructions tell Windows users to open the executable and follow the installer screens. This article has not verified the exact filename, unattended installation options, or whether administrator privileges are required, so it does not prescribe fixed values for them. If you see a security warning or an installation block, check the exact message and the download source rather than bypassing the block automatically. Installation guide
3. Install on macOS
- Open
Aside.dmgin your Downloads folder. - Drag the Aside icon into
Applications. - Launch Aside from
Applications. - Check the initial launch screen, then continue to account setup.
These steps follow the official download page. If the app will not open, first check your macOS version and the displayed error. Review system access requested for browser data import separately from permissions needed to install the app itself.
4. Sign in and import browser data
When you first open Aside, sign in or create an account. During the import stage of setup, select the browser profile you want to use, review the requested system access, and wait for the import to finish. The official guide lists browsing history, cookies, and bookmarks as importable data. Getting-started guide
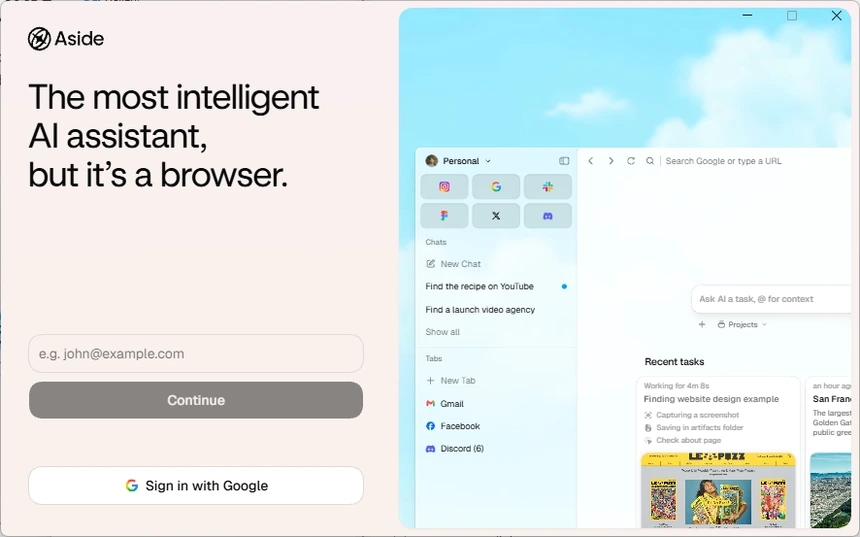
If you sign in with Google, use your own account on the authentication screen shown below.
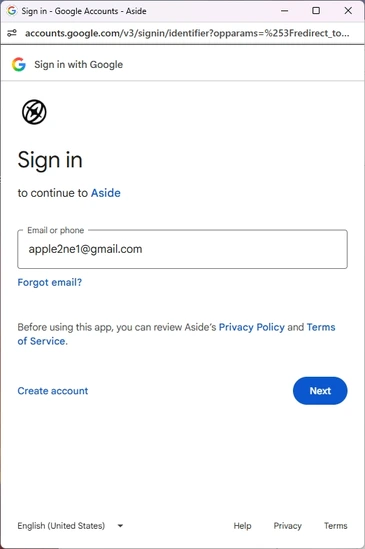
If you have several profiles, choose the one associated with the account you will use for this exercise. Importing cookies does not guarantee that you remain signed in to every website; open the sites you need and check their sign-in state.
Safari uses file import. Following the official guide, select the ZIP file created through Safari’s File > Export. This flow requires a ZIP file; changing another file’s extension to ZIP does not make it usable. Safari import guide
5. Review password autofill and access policies
Importing browser history and importing passwords are separate settings. Under Settings > Passwords, check whether to use the default password manager and review autofill settings. To transfer passwords, open Settings > Passwords > Import, select the source manager, and import its exported file. If you do not need this feature, you do not have to transfer all your passwords at this stage. Password settings guide
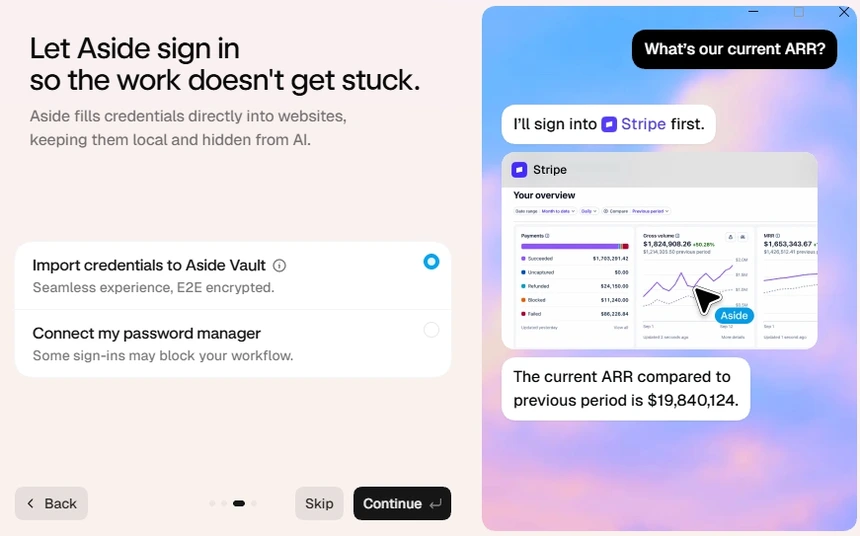
Review the AI’s policy for using saved credentials under Access policy for AI agents. The official documentation lists Always allow, While unlocked, and Never, with Always allow as the default. Review this setting for your intended use. Keeping password values hidden from the AI and allowing the AI to access an account through autofill are separate concepts.
Password export files contain sensitive information. After importing, decide whether you still need to keep the file, and do not leave it in a shared folder or public repository. You can also start by signing in manually to only the sites needed for your trial.
6. Configure AI models and usage
During initial setup, choose the built-in plan or connect an existing AI subscription, as shown below. After making that initial choice, you can still add providers and choose models through the settings described in this section.
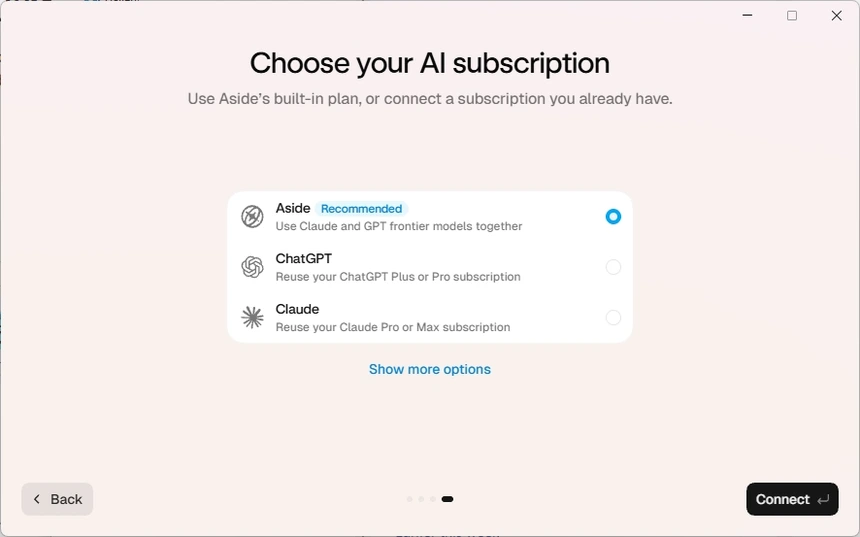
You can subscribe separately to a paid Aside plan, but if you already have a supported paid ChatGPT or Claude plan, you can connect that existing AI subscription to Aside. Aside’s official guide describes support for ChatGPT Plus and Pro, and Claude Pro and Max subscriptions. Connecting an existing subscription is separate from an Aside plan; the connection alone does not provide every feature of a paid Aside plan. AI subscription connection guide
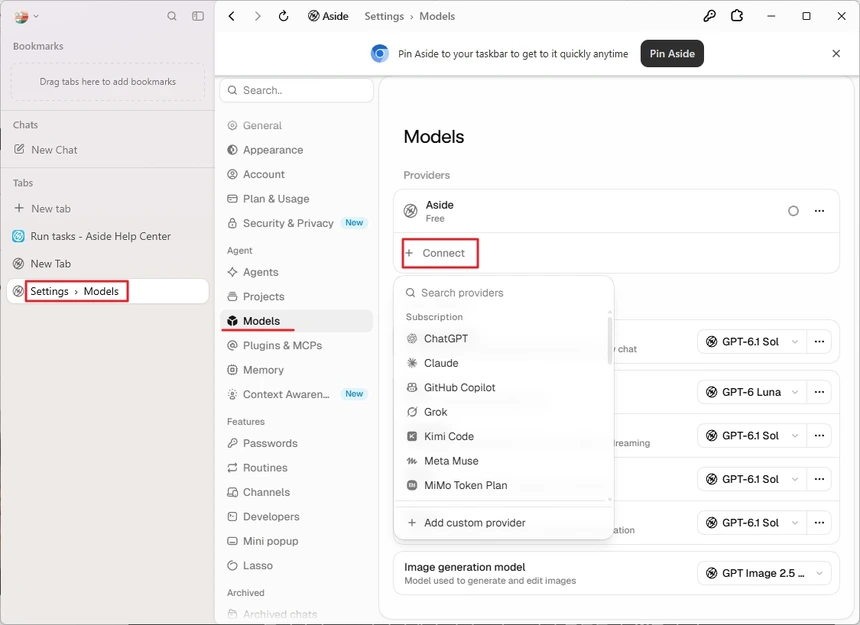
Check which model providers to use under Settings > Models. The official help page distinguishes three connection types. AI provider settings
| Type | Purpose |
|---|---|
| Aside | Use models included in an Aside plan |
| Subscription | Connect a supported existing AI subscription |
| API | Connect your own model provider API key |
To begin, sign in to your Aside account and choose a model available on your current plan to check that it works. To connect an existing ChatGPT or Claude subscription, open Settings > Models and select + Connect in the Providers section. The menu is named Models, not Modes. Under Subscription in the list that opens, select ChatGPT or Claude as appropriate, sign in with that account in the authentication window, and return to Aside. After connecting, select the default model to use under Settings > Models > Task models. Treat connecting a subscription provider and selecting the actual task model as separate steps. This path was checked against the official help page and the settings screenshot below. Subscription connection and model selection guide
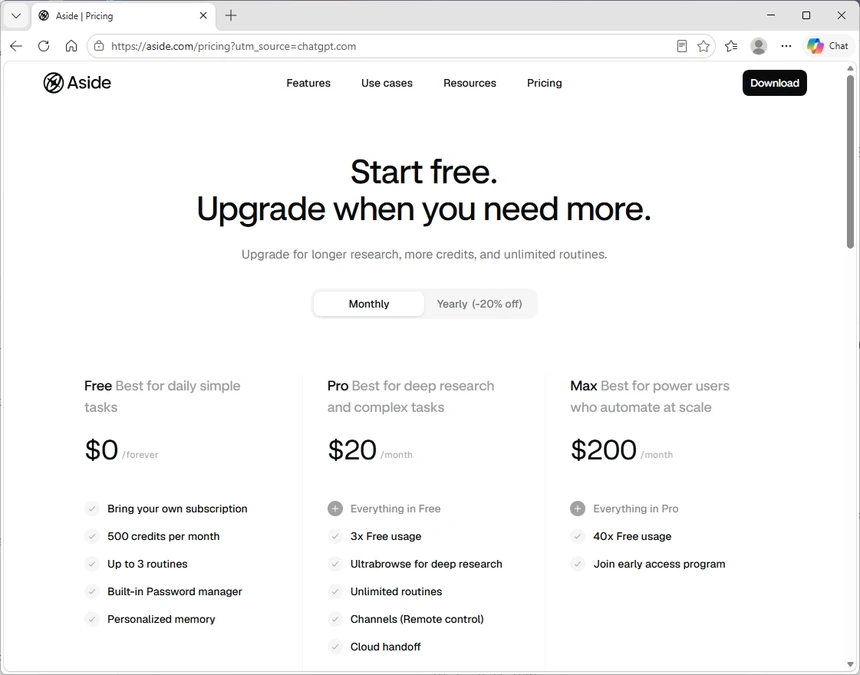
Check your plan and credits under Settings > Plan & Usage. As of the source review date, the official subscription documentation lists 500 monthly credits for Free, but that does not mean 500 tasks. Using an external API key may incur separate charges on that provider account. Check your own account screen for subscription connection availability and actual usage limits. Usage and subscription guide
7. Review permissions and privacy before your first task
Guard below the input field is the menu for selecting the AI permission mode for the current task. Use it to set the scope of file access and work available to the AI. Click Guard to choose Read only, Guard, or Full access. In the default Guard mode, Aside works within approved folders and asks before accessing other folders. Permission mode guide
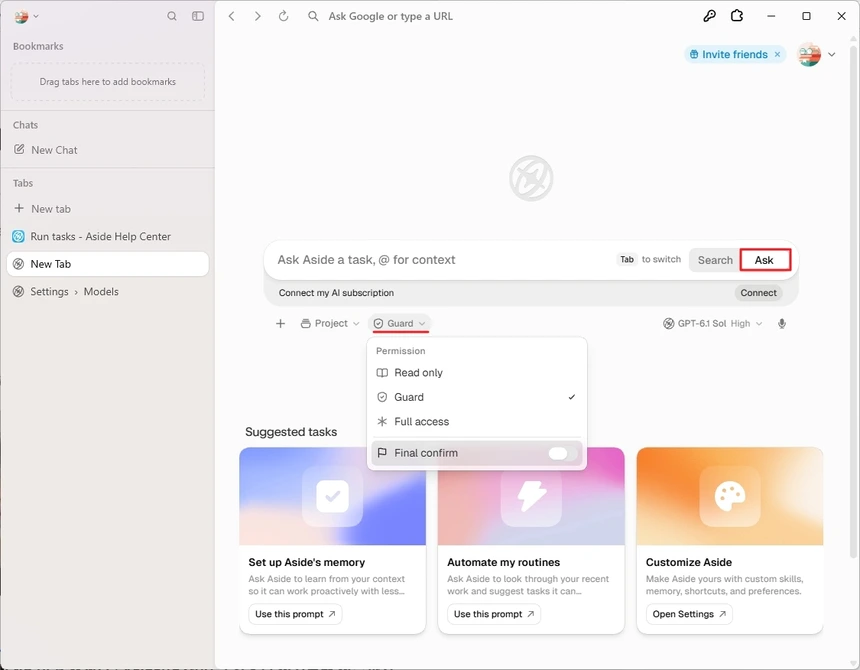
Alongside the task’s permission mode, check file and tool permissions under Settings > Agents. The official help page distinguishes file access in the three modes as follows. Permission settings
| Mode | File access scope |
|---|---|
| Read only | Inspect context without changing files |
| Guard | Work in approved folders and ask before accessing other folders |
| Full access | Read and write files throughout the computer |
The default mode is Guard. For this public-page reading exercise, select Read only and also review the tool-level Allow, Ask, and Deny settings. Do not interpret a file permission mode’s name as a guarantee that all website changes are blocked; state the read-only scope in your task request as well.
Under Settings > Security & Privacy, review browsing history, cookies, and analytics sharing. The official documentation says analytics sharing is on by default. Use this step to decide what information to keep rather than clearing your entire history at the outset. Privacy settings
8. Check your first task using a public page
Start by summarizing one public page to learn how input and responses work, then expand to browsing websites and comparing products. Follow this order: page summary → website browsing → product comparison.
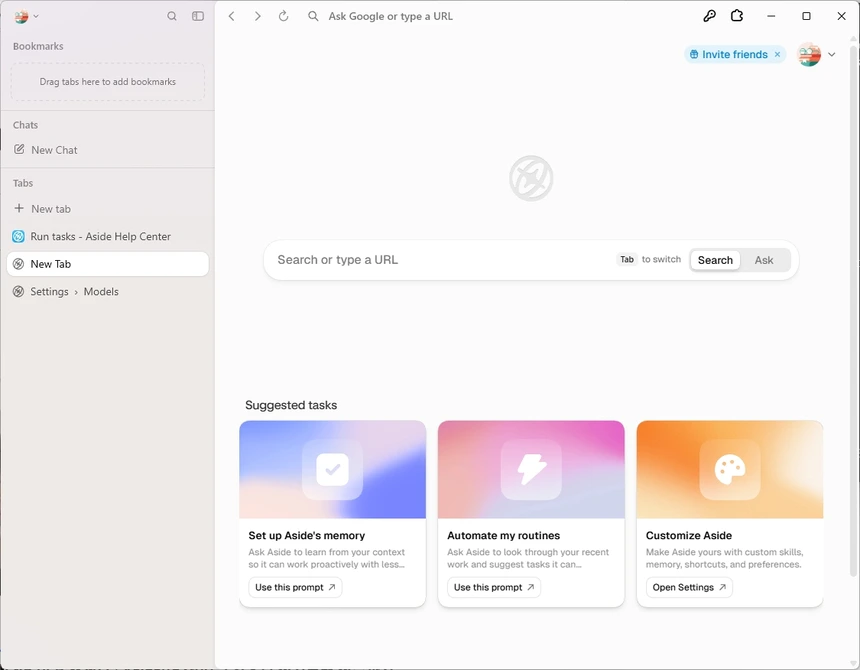
In the new-tab input field, distinguish between Search and Ask. Search is for entering a query to search the web, while Ask sends a question or task instruction to the AI as a prompt. The official help page calls the AI task mode Ask AI. For example, use Search to find relevant pages yourself, or select Ask or Ask AI to delegate a task such as “Read this page and summarize the key points.” Specify the target website, desired result, and scope when making an AI request. Browser search and Ask AI guide
Practice a reading task with a public page
Open a new tab from the left sidebar and select the AI input mode. The example below includes the official getting-started page URL, so you can submit it directly in the new-tab input field. If you have already opened the page, you can also make the request in the side panel. Specify the page to use and the result you want. Task guide
Paste the following example into Aside’s task input field. This is a reading exercise for checking the result. The reference to item 8 in the final sentence means section 8 of this installation article you are reading, not the linked official help page. If the AI has not received this article, it may be unable to find that section, so you should compare the source page and the summary yourself.
Read https://docs.aside.com/help/get-started and summarize the initial Aside setup process in no more than five steps.
Include a supporting source link for each step, and clearly separate anything you could not verify on the page.
Do not log in, modify files, download anything, send messages, or change account settings.
On both the first and last lines of your response, display the same verdict: either “Ready to proceed to the next step” or “Hold off on proceeding to the next step.”
Choose “Ready to proceed to the next step” only if you actually read the page and provide both a summary and sources.
Explain the reason for your verdict and identify any failed actions or unverified items. For the next action, instruct the user to compare the original page with the summary in item 8 of this article’s main body.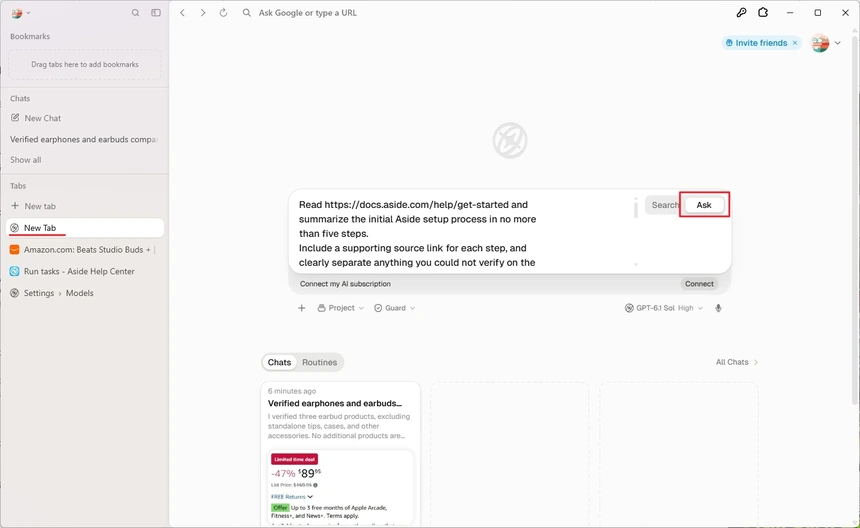
The screenshot above shows Guard, but for this article’s reading exercise, select Read only as described in step 7 before sending the request. The next screenshot shows the summary and sources returned by the AI.
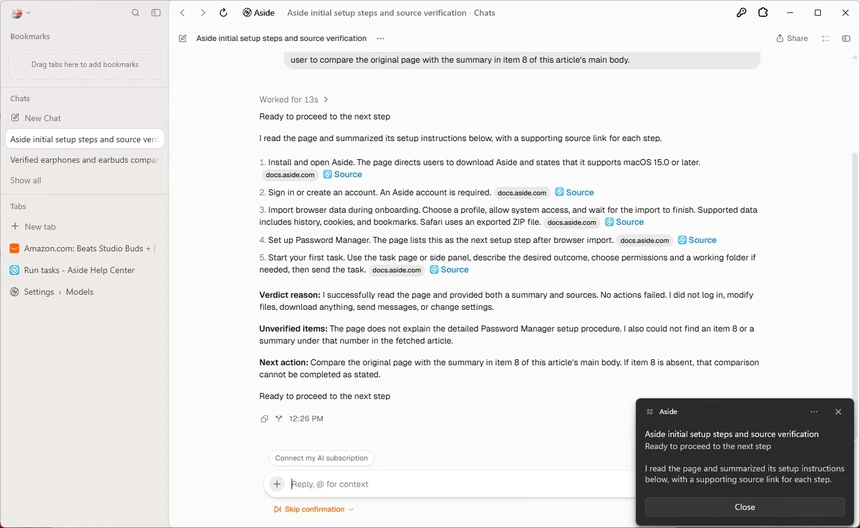
This response provides a summary and sources while also stating that it could not find item 8. Read the unverified items as well as the verdict that it is ready to proceed. If the screenshot text is too small, read the response in your actual Aside conversation and open each source to compare the content.
When the task finishes, open the links yourself and compare the summary with the source. Do not judge success solely by the AI’s completion message. If it could not read the page or a source points to different content, record that limitation. If the task is waiting for a sign-in or approval, check its detail screen first.
Open a website in a new tab
After checking the page summary, try browsing a website yourself and handing a task to the AI.
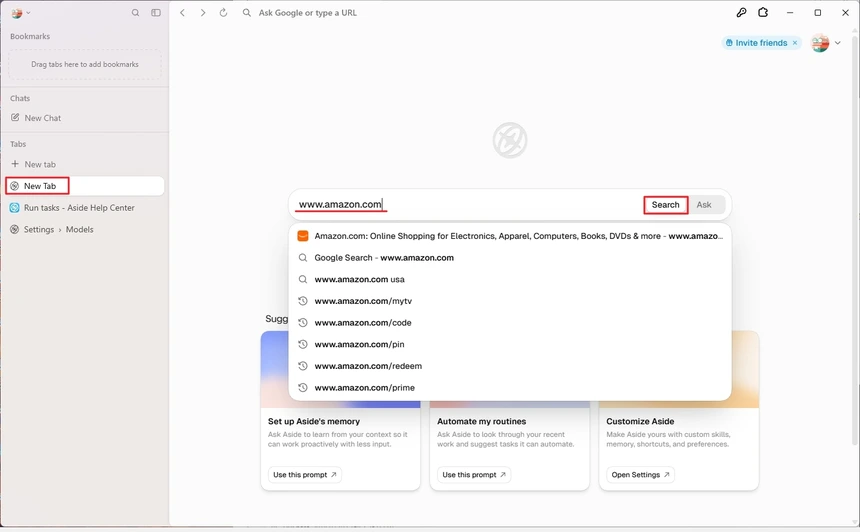
Click New tab on the left to open a new tab. Select Search in the input field, then find a website with a query or enter its address to visit it. The screenshot below shows www.amazon.com being entered.
Ask about the current page with Ask Aside
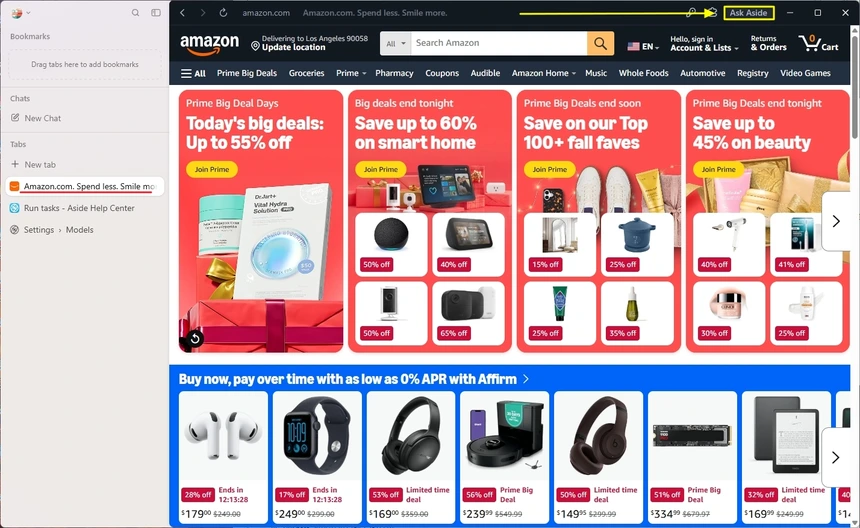
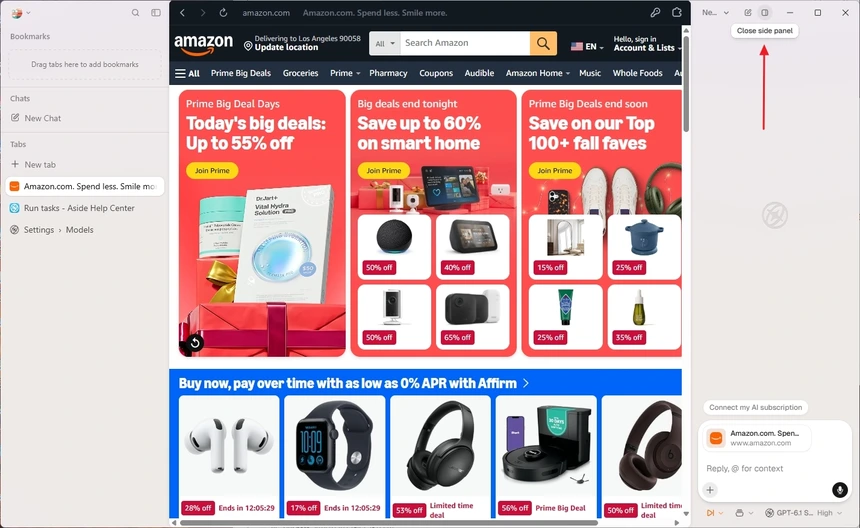
When you find something to delegate while browsing a site, click Ask Aside at the top of the browser. A side panel opens to the right of the webpage with a field for entering a prompt for the AI.
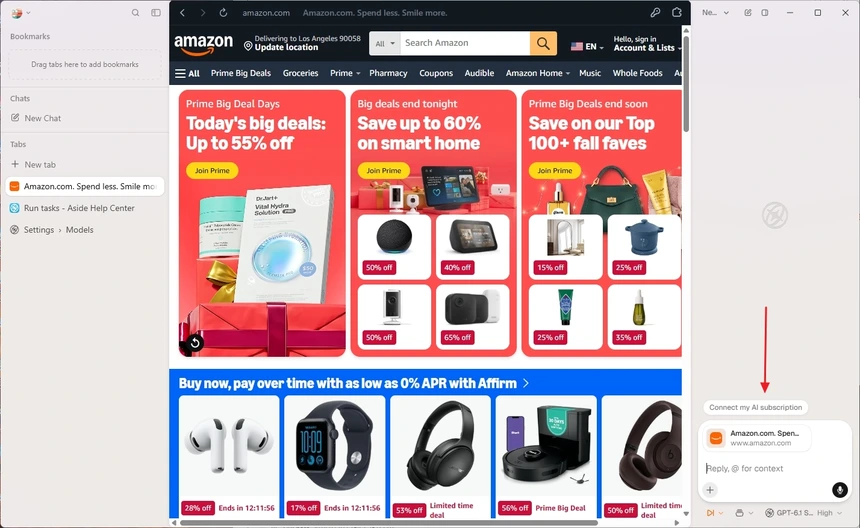
The side panel’s input area shows a page attachment with the current page’s title and hostname. Keep this attachment so the AI can use the page you are viewing, then enter and send your question or task. For example, you could ask, “Summarize the features of the products shown on this page.” Removing the page attachment lets you start a task without passing that page as context. Opening the panel does not mean the AI has already finished analyzing the page; use a prompt to specify the result you want. Side panel guide
Structure prompts around where, what, the request, and what not to do
When assigning a task through Aside’s input field, include where to work, what to work on, how to present the result, and what not to do to make the request clear. Specify the target, conditions, and output format rather than giving only a website name.
| Element | What to specify | Example |
|---|---|---|
| Where | The website to work on | On Amazon |
| What | The target and conditions | Three earphones priced at $100 or less |
| Request | The task and output format | Compare them in a table |
| What not to do | Actions to avoid | Do not make payments |
You can enter the example below in the Ask or Ask Aside input field.
Compare three earphones priced at $100 or less on Amazon and organize the results in a table, but do not make any payments.This does not mean that three matching products actually exist. For a more precise comparison, add the following conditions in the same conversation. The English text below supplies additional conditions, so send it together with the earlier requirements: Amazon, $100 or less, and three products.
Only include earphones or earbuds, and exclude accessories such as replacement ear tips and cases.

Create a table with the model name, price, whether each product is wired or wireless, whether it supports noise cancellation, and a product link.

If fewer than three products meet the criteria, list only the products you verified and state how many more are needed to reach three.

Do not guess any information you cannot verify. Mark it as “Unverified.”

Do not add anything to the cart, place orders, or make payments.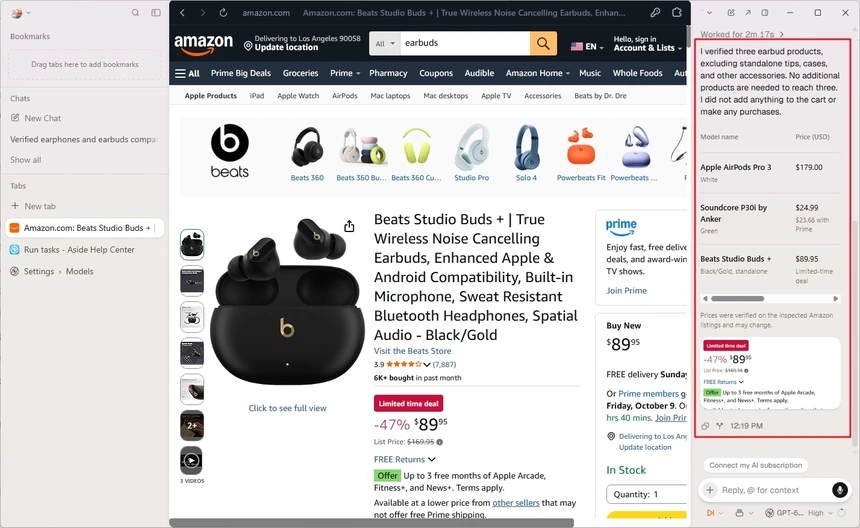
This result includes a $179 product, so it does not meet the requested limit of $100 or less. Even when the AI says it has verified the results, compare the prices and conditions yourself. In this situation, ask for a correction in the same conversation: “Exclude items over $100 and compare again. Tell me if there are not enough products that meet the criteria.” Prices shown are those displayed when the screenshot was taken and may differ at the time of purchase.
Close the Ask Aside panel
To close Ask Aside, click the Close side panel icon at the top of the panel. Hovering over the icon indicated by the arrow in the screenshot below displays that tooltip.
9. Troubleshoot installation and initial setup
| Symptom | What to check first |
|---|---|
| Download does not start | The manual download link on the official page |
| Installer will not run | Operating system, file source, and exact error message |
| Browser import fails | Whether the source profile exists, whether the source browser needs to be closed, and the file format |
| AI task is waiting | Questions, approval requests, or website authentication requests in the task details |
| Autofill does not appear | Default manager, autofill, excluded domains, and incognito settings |
| Model is unavailable | Selected provider connection and plan or credit status |
An import failure and a waiting task are different problems. The official troubleshooting guide recommends checking the source profile and file import method, responding to pending requests, and reviewing autofill settings. If MFA or a CAPTCHA appears, you may need to complete that authentication step yourself. Troubleshooting guide
If the problem continues, use Settings > Send feedback in the app or contact the official support address, support@aside.com. Include the time, operating system and app version, expected result, actual result, and error message to help reproduce the problem. Task feedback can include the conversation and diagnostic information, so review what you send. Do not start troubleshooting installation problems by clearing the entire password vault.
Writing and verification details
- Written and sources reviewed on: 2026-10-07.
- Verification method: Compared Aside’s official installation, getting-started, model, permission, and troubleshooting documentation with user-provided Windows screenshots.
- Hands-on Windows or macOS installation, account connection, and example task execution were not performed by the author.
- Menu names follow the official help pages reviewed and may differ in the installed version.
References and sources
- Aside Download — Downloads and installation for each operating system.
- Get started — Accounts, data import, and first launch.
- Aside Browser Changelog — Windows release and version changes.
- Configure AI providers — Connecting model providers.
- Manage your Aside subscription — Credits and separate external charges.
- Configure password autofill — Password import and AI access policies.
- Set agent permissions — Task, file, and tool permissions.
- Manage privacy and local data — Privacy and history settings.
- Run tasks — Task input and current-page context.
- Troubleshoot Aside — Initial setup errors and support requests.
- Use Aside as your browser — New-tab Search and Ask AI modes and task requests.
- Use the side panel — Current-page attachments and starting tasks in the side panel.